Harvey Performance Company
  • About Us
    • Company Overview
    • Our Unique Strengths
    • Our Partners
    • Our History
    • Our Locations
    • Sustainability
    • Giving Back
      • Giving Back
      • One Tree Planted
    • News
      • News
      • Press
  • Our Brands
    • Harvey Tool
    • Helical Solutions
    • Micro 100
    • Titan USA
    • CoreHog
    • Valor Holemaking
    • ATA Air Tools
    • ATA SGSPRO
    • Garryson
    • Industrial Tooling Corporation (ITC)
    • Karnasch
    • Van Hoorn Carbide
  • Products
    • Milling
    • Drilling
    • Grinding
    • Micro Tools
    • Sinking
    • Sawing
    • Composite Tools
    • Threading
    • Turning
    • Beveling
    • Reaming
    • Air Tools
  • Solutions
    • Aerospace
    • Automotive
    • Defense
    • Energy
    • Foundries
    • Marine
    • Medical
    • Mold & Die
    • Oil & Gas
    • Power Generation
    • Rail
  • Resources
    • CAM & TDM Tool Libraries
    • Machining Advisor Pro
    • In the Loupe Blog
    • Webinars
  • Careers
  • Contact Us
  • Menu Menu
  • Link to LinkedIn
  • Link to Facebook

How to Avoid Common Part Finish Problems

April 25, 2017/7 Comments/in CNC Machining, How-To's, Machining 101, Quick Tips, Troubleshooting Tips/by Harvey Performance Company

Part Finish Reference Guide

Finishing cuts are used to complete a part, achieving its final dimensions within tolerance and its required surface finish. Most often an aesthetic demand and frequently a print specification, surface finish can lead to a scrapped part if requirements are not met. Meeting finish requirements in-machine has become a major point of improvement in manufacturing, as avoiding hand-finishing can significantly reduce costs and cycle times.

Common Finishing Problems

  • Burrs
  • Scallop marks
  • Chatter Marks

Factors That Influence Part Finish

  • Specific material and hardness
  • Cutting tool speeds & feeds
  • Tool design and deployment
  • Tool projection and deflection
  • Tool-to-workpiece orientation
  • Rigidity of workholding
  • Coolant and lubricity
  • Final-pass depth of cut

Finishing Problem Solutions

  • Tools with high helix angles and flute counts work best for finishing operations. Softer materials show great results with higher helices, while harder materials can benefit greatly from increased flute counts.
  • Increase your RPM and lower your IPT (Figure 2).
  • Ensure that tool runout is extremely minimal.
  • Use precision tool holders that are in good condition, are undamaged, and run true.
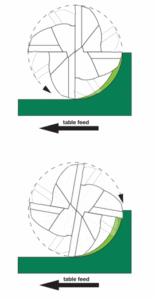
  • Opt for a climb milling machining method.
  • Use tooling with Variable Pitch geometry to help reduce chatter.
  • A proper radial depth of cut (RDOC) should be used. For finishing operations, the RDOC should be between 2 and 5 percent of the tool’s Cutter Diameter.
  • For long reach walls, use reduced neck tooling which help to minimize deflection (Figure 3).
  • Extreme contact finishing (3x cutter diameter), may require a 50% feed rate reduction.

part finish guide

length of cut

Common Surface Finish Nomenclature

Ra = Roughness average
Rq = RMS (Root Mean Square) = Ra x 1.1
Rz = Ra x 3.1

part finish guide

Share this entry
  • Share on Facebook
  • Share on X
  • Share on WhatsApp
  • Share on Pinterest
  • Share on LinkedIn
  • Share on Reddit
  • Share by Mail

https://www.harveyperformance.com/wp-content/uploads/2017/04/Feature-Image-Part-Finish-Reference-Guide-IMG.jpg 525 1400 Harvey Performance Company http://www.harveyperformance.com/wp-content/uploads/2018/08/Logo_HarveyPerformanceCompany-4.png Harvey Performance Company2017-04-25 12:30:242022-06-08 09:21:37How to Avoid Common Part Finish Problems

Overcoming Composite Holemaking Challenges

April 21, 2017/0 Comments/in CNC Machining, Composites, Drilling & Holemaking, Holemaking, Machining Techniques, Material Specific, Milling, Tool Selection/by Harvey Performance Company

Harvey Tool’s Miniature High Performance Composite Drills are specifically designed with point geometry optimized for the unique properties of composite materials. Our Double Angle style is engineered to overcome common problems in layered composites and our Brad Point style is built to avoid the issues frequently experienced in fibrous composites.

Common Composite Problems

Drilling in composite materials is a unique challenge. There are a wide variety of regularly machined composites, each requiring different considerations and approaches. Overcome common composite holemaking problems by identifying and selecting the right tool for your job.

Delamination

Defining Delamination

Delamination occurs when high drilling forces cause laminated layers to separate, yielding less structurally-sound parts. The more blunt a drill point is, the more force it will take to move through a part, increasing the chance of delamination.

Delamination and Push-Out

Identifying Delamination

The separation of layers may be difficult to identify through visible scrutiny. Closely inspecting and testing the hole quality is ideal when looking for delamination.

Ideal Drill Choice

Double Angle Composite Drills

Uncut Fibers

Defining Uncut Fibers

Uncut fibers are largely caused by dull tooling. If a drill’s cutting edge is not sharp enough, fibers will remain uncut, frayed, or splintered, potentially ruining the part.

Identifying Uncut Fibers

Uncut fibers should be easily noticed: look for splintered or frayed fibers around the edges of your hole.

Ideal Drill Choice

Brad Point Composite Drills

Tear-Out

Defining Tear-Out

Rather than leaving uncut fibers hanging on to a workpiece, dull tools can also grab fibers and tear them out of the material altogether. This can leave voids in your material and cause damage to even greater areas of the workpiece.

Tear Out

Identifying Tear-Out

Tear-out can be more difficult to spot than uncut fibers. However, it is often seen as an area of material completely removed around the edge of a hole.

Ideal Drill Choice

Brad Point Composite Drills

Choose Your Tool

Harvey Tool’s new Composite Drills are engineered with point geometry optimized for fibrous and layered composite materials. Each design is specifically built to overcome common composite drilling challenges and achieve excellent results.

Double Angle Composite Drills

Avoid Delamination and Push-Out

composite drills Harvey

v

Harvey Tool’s Double Angle Composite Drills help combat delamination and push-out in layered composite materials with specialized point geometry. The primary 130° point angle allows the drill to efficiently engage laminated composites without lifting the top layer of material. The shallower secondary 60° point angle reduces the amount of force required to move the drill through the material, further reducing the probability of delamination. The higher shear angle also aids in reducing push-out at the back of the workpiece by more gradually breaking through the part.

Brad Point Composite Drills

Avoid Uncut Fibers and Tear Out

composite drills

Harvey Tool’s Brad Point Composite Drills are designed specifically for superior performance in fibrous materials. The trident-like brad point ensures that holes in fiber filled and reinforced materials come out clear and free of fraying. The outer points accurately score the outer diameter of drilled holes, eliminating uncut fibers, tear-out, and splintering.

For more information on Composite Drills and all of Harvey Tool’s new products, visit the Harvey Tool website.

https://www.harveyperformance.com/wp-content/uploads/2017/04/Feature-Image-Composite-Holemaking-Challenges.jpg 525 1401 Harvey Performance Company http://www.harveyperformance.com/wp-content/uploads/2018/08/Logo_HarveyPerformanceCompany-4.png Harvey Performance Company2017-04-21 10:00:312024-11-06 13:16:28Overcoming Composite Holemaking Challenges

Circular Interpolation: Machining Circular Tool Paths

April 19, 2017/25 Comments/in CNC Machining, CNC Programming, Machining 101, Machining Techniques, Milling/by Harvey Performance Company

When machining, proper speeds and feeds are very important to avoid breakage and maximize performance. Traditional end milling formulas use Surface Footage (SFM) and Chip Load (IPT) to calculate Speed (RPM) and Feed (IPM) rates. These formulas dictate the correct machining parameters for use in a linear path in which the end mill’s centerline is travelling in a straight line. Since not all parts are made of flat surfaces, end mills will invariably need to move in a non-linear path. In the case of machining circular tool paths, the path of the end mill’s centerline is circular. Not surprisingly, this is referred to as Circular Interpolation.

Decrease Cycle Times and Increase Shop Efficiency. Download Our HEM Guidebook.

Cutting Circular Tool Paths

All rotating end mills have their own angular velocity at the outside diameter. But when the tool path is circular, there is an additional component that is introduced, resulting in a compound angular velocity. Basically, this means the velocity of the outside diameter is travelling at a substantially different velocity than originally expected. The cause of the compound angular velocity is seen in the disparity between the tool path lengths.

Internal Circular Tool Paths

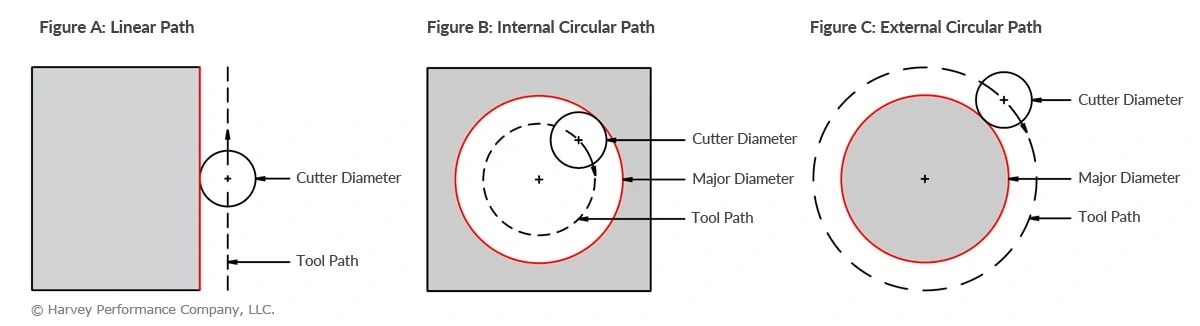
Figure A shows the cross section of a cutting tool on a linear path, with the teeth having angular velocity due to tool rotation, and the center of the tool having a linear feed. Note that the tool path length will always be equal to the length of the machined edge. Figure B shows the same cutting tool on an internal circular path, as done when machining a hole. In this case, the angular velocity of the teeth is changed as a result of an additional component from the circular path of the tool’s center. The diameter of the tool path is smaller than that of the major diameter being cut. Or, in other words, the tool path length is shorter than the machined edge length, increasing the angular velocity of the teeth. To prevent overfeeding and the possibility of tool breakage, the increased angular velocity of the teeth must be made the same as in the linear case in Figure A. The formula below can be used to properly lower the feed rate for internal machining:

Internal Adjusted Feed = (Major Diameter-Cutter Diameter) / (Major Diameter) × Linear Feed

Infographic showcasing 3 different cnc Circular Tool Paths

External Circular Tool Paths

Figure C shows the same cutting tool on an external circular path, as done when machining a post. In this case, the diameter of the tool path is larger than the major diameter being cut. This means that the tool path length is longer than the machined edge length, resulting in a decreased angular velocity. To prevent premature dulling and poor tool life due to over-speeding, use the formula below to properly raise the feed rate for external machining. In this way, the decreased angular velocity of the teeth is made the same as in the linear case in Figure A.

External Adjusted Feed = (Major Diameter+Cutter Diameter) / (Major Diameter) × Linear Feed

Optimize Your Performance

By adjusting the feed in the manner provided, internal applications can avoid tool breakage and costly down time. Further, external applications can enjoy optimized performance and shorter cycle times. It should also be noted that this approach can be applied to parts with radiused corners, elliptical features and when helical interpolation is required.


https://www.harveyperformance.com/wp-content/uploads/2017/04/Featured-Image-Circular-Interpolation-IMG-1-1.jpg 525 1400 Harvey Performance Company http://www.harveyperformance.com/wp-content/uploads/2018/08/Logo_HarveyPerformanceCompany-4.png Harvey Performance Company2017-04-19 09:08:262024-02-12 11:33:25Circular Interpolation: Machining Circular Tool Paths

Selecting the Right Plastic Cutting End Mill

April 7, 2017/7 Comments/in CNC Machining, Harvey Tool, Material Specific, Plastics, Tool Information Guides, Tool Selection, Troubleshooting Tips/by Harvey Performance Company

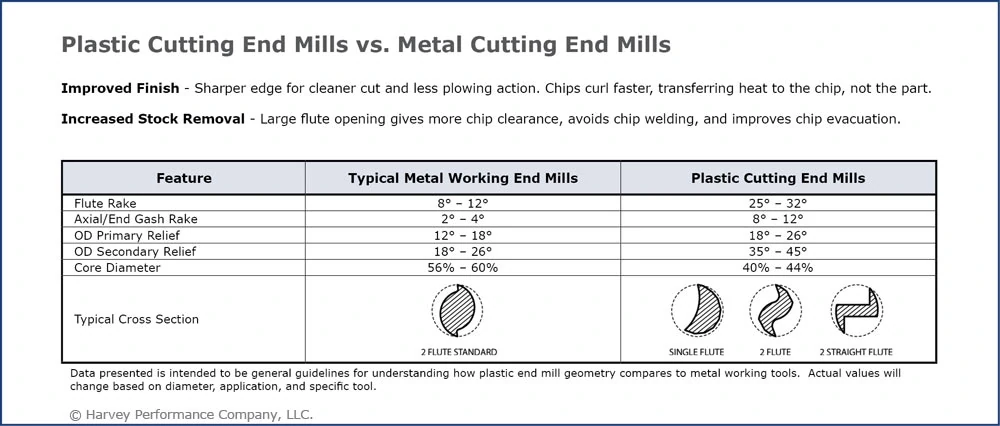
Many challenges can arise when machining different types of plastics. In the ever changing plastics industry, considerations for workholding, the melting point of your material, and any burrs that may potentially be created on the piece need to be examined prior to selecting a tool. Choosing the correct tool for your job and material is pivotal to avoid wasting time and money. Harvey Tool offers One, Two, and Three Flute Plastic Cutting End Mills with Upcut and Downcut Geometries. The following guide is intended to aid in the tool selection process to avoid common plastic cutting mistakes.

three Harvey tool plastic cutting end mills

Choose Workholding Method

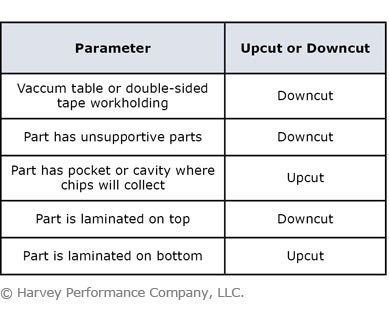
When it comes to workholding, not all plastic parts can be secured by clamps or vices. Depending on the material’s properties, these workholding options may damage or deform the part. To circumnavigate this, vacuum tables or other weaker holding forces, such as double sided tape, are frequently used. Since these workholdings do not secure the part as tightly, lifting can become a problem if the wrong tool is used.

Downcut Plastic Cutting End Mills — tools with a left hand spiral, right hand cut — have downward axial forces that push chips down, preventing lifting and delamination. If an Upcut Plastic Cutting End Mill is required, then a tool with minimal upward forces should be chosen. The slower the cutter’s helix, the less upward forces it will generate on the workpiece.

Chart of workholding parameters and their preferred selection to upcut or downcut as a result

Determine Heat Tolerance

The amount of heat generated should always be considered prior to any machining processes, but this is especially the case while working in plastics. While machining plastics, heat must be removed from the contact area between the tool and the workpiece quickly and efficiently to avoid melting and chip welding.

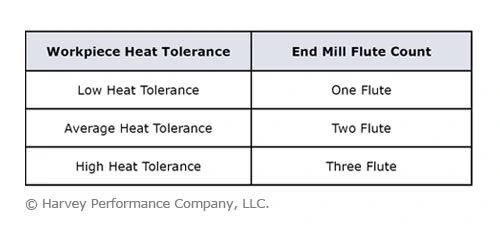
If your plastic has a low melting point, a Single Flute Plastic Cutting End Mill is a good option. This tool has a larger flute valley than its two flute counterpart which allows for bigger chips. With a larger chip, more heat can be transferred away from the material without it melting.

For plastics with a higher heat tolerance, a Two or Three Flute Plastic Cutting End Mill can be utilized. Because it has more cutting edges and allows for higher removal rates, its tool life is extended.

Chart of end mill flute count and their respective workpiece heat tolerance levels

Consider Finish Quality & Deburring

The polymer arrangement in plastics can cause many burrs if the proper tool is not selected. Parts that require hand-deburring offline after the machining process can drain shop resources. A sharp cutting edge is needed to ensure that the plastic is sheared cleanly, reducing the occurrence of burrs. Three Flute Plastic Cutting End Mills can reduce or eliminate the need to hand-deburr a part. These tools employ an improved cutting action and rigidity due to the higher flute count. Their specialized end geometry reduces the circular end marks that are left behind from traditional metal cutting end mills, leaving a cleaner finish with minimal burrs.

Shop Harvey Tool Plastic Cutting End Mills Today

Flute Count Case Study

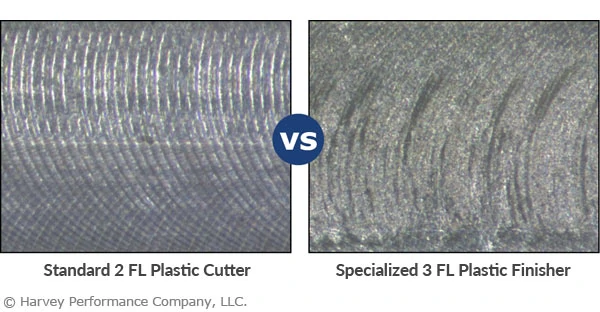
2 FLUTE PLASTIC CUTTER: A facing operation was performed in acrylic with a standard 2 Flute Plastic Cutting End Mill. The high rake, high relief design of the 2 flute tool increased chip removal rate, but also left distinct swirling patterns on the top of the workpiece.

3 FLUTE PLASTIC FINISHER: A facing operation was performed on a separate acrylic piece with a specialized 3 Flute Plastic Finisher End Mill. The specialized cutting end left minimal swirling marks and resulted in a smoother finish.

Image of facing operation patterns from a standard 2 flute plastic cutter beside another image from a specialized 3 flute plastic finisher

Identifying the potential problems of cutting a specific plastic is an important first step when choosing an appropriate plastic cutter. Deciding on the right tool can mean the difference between an excellent final product and a scrapped job. Harvey Tool’s team of technical engineers is available to help answer any questions you might have about selecting the appropriate Plastic Cutting End Mill.

Chart of plastic cutting end mills vs metal cutting end mills that compares values on their features
https://www.harveyperformance.com/wp-content/uploads/2017/04/Feature-Image-Plastic-Cutter-Selection-IMG.jpg 525 1400 Harvey Performance Company http://www.harveyperformance.com/wp-content/uploads/2018/08/Logo_HarveyPerformanceCompany-4.png Harvey Performance Company2017-04-07 08:31:562023-09-21 13:29:01Selecting the Right Plastic Cutting End Mill

Your Guide to Thin Wall Milling

April 3, 2017/1 Comment/in CNC Machining, CNC Programming, Machining 101, Machining Techniques, Milling, Tech Tips, Troubleshooting Tips/by Harvey Performance Company

Milling part features with thin wall characteristics, while also maintaining dimensional accuracy and straightness, can be difficult at best. Although multiple factors contribute, some key components are discussed below and can help to increase your thin wall milling accuracy.

Use Proper Tooling

Necked Tooling

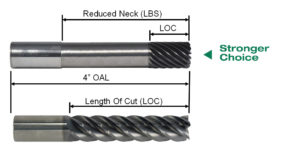
Long length tooling with a long length of cut can spell trouble in thin wall milling situations due to deflection, chatter and breakage. It is essential to keep your tool as strong as possible while maintaining the ability to reach to the desired depth. Necked-down tooling provides added tool strength while also helping you to reach greater than 3x Diameter depths.

image comparing end mills with and without a reduced neck

The total extension of an end mill, referred to as length below shank (LBS), represents the dimension that characterizes the necked length of the tool in use. This measurement is taken from the beginning of the necked section to the bottom of the cutting end of the tool. The neck relief serves the purpose of creating room for chip removal and preventing the shank from friction in deep-pocket milling scenarios.

Depth of Cut Selection

Axial Depth of Cut (ADOC)

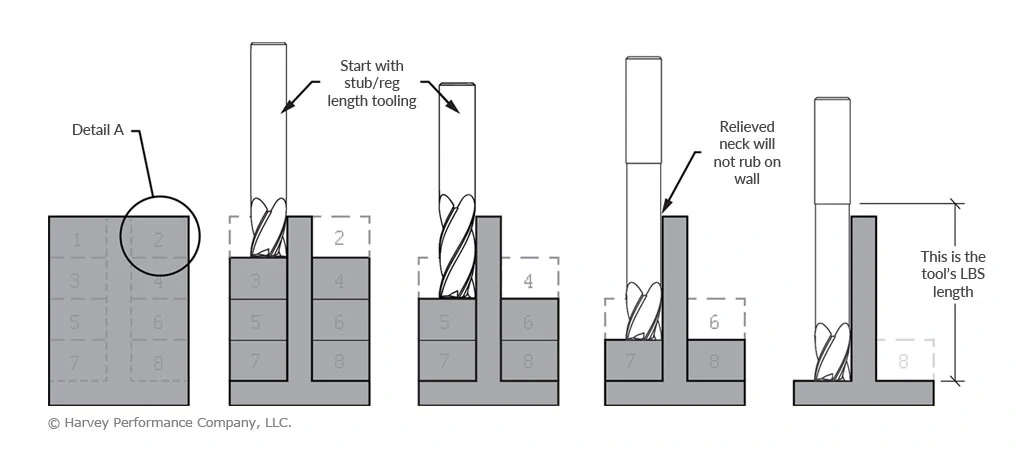
To support the walls during thin wall machining, keep a wide-cross section behind it. We recommend utilizing a “stepped down” approach, which divides the total wall height to manageable depths while working each side of the wall. The Axial Depth of Cut (ADOC) dimension will vary depending on the material (and its hardness) being cut.

Chart of proper ADOC in thin wall milling

Radial Depth of Cut (RDOC)

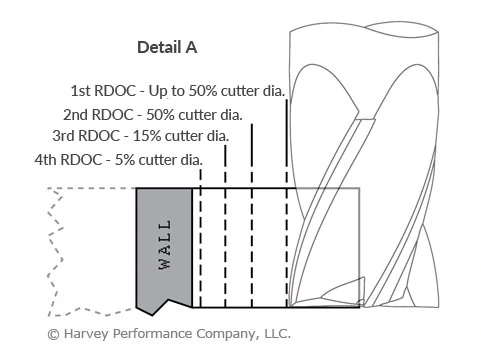
A progressive Radial Depth Of Cut (RDOC) strategy is also important as the thin wall height is increasing. Reducing tool pressure while support stock is disappearing is equally important to keep the thin wall stable.

  • Detail A represents a 5-step progressive radial approach. The number of passes will depend upon your particular application, material hardness and final wall dimensions.
  • This approach helps to keep the pressure off the wall as you make your way towards it. Additionally, it is recommended to alternate sides when using this RDOC strategy.
  • The final RDOC passes should be very light to keep wall vibration to a minimum while maximizing your part finish.

RDOC steps in thin wall milling

Additional Thin Wall Milling Accuracy Tips:

Climb Milling

Climb milling, gaining popularity among machinists seeking efficiency and extended tool life, minimizes heat generation and friction. Chips are ejected behind the cutter, reducing the likelihood of chip recutting. The chip initiates at its widest point and diminishes, leading to the transfer of generated heat into the chip rather than the tool or workpiece. This results in longer tool lifespan, enabling more parts per tool and lessened costs. Additionally, it contributes to a superior part finish by optimizing chip formation at the cutting edge.

drawing demonstrating the difference between conventional and climb milling with the direction of an end mill

Wall Stabilization

Manual vibration dampening and wall stabilization can be achieved by using thermoplastic compounds, or wax, which can be thermally removed.

HEM Toolpaths

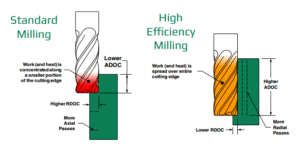
The use of HEM toolpaths can optimize tool performance. It is an advanced machining approach which involves combining a low RDOC (Radial Depth of Cut) with a high ADOC (Axial Depth of Cut), along with elevated feed rates. This combination aims to enhance material removal rates and reduce tool wear.

High Efficiency Milling (HEM) varies from conventional milling, where a higher RDOC and lower ADOC are usually recommended. Conventional milling tends to generate concentrated heat in a specific area of the cutting tool, expediting tool wear. Additionally, while conventional milling requires more axial passes, HEM toolpaths involve more radial passes.

https://www.harveyperformance.com/wp-content/uploads/2017/04/Feature-Image-Thin-Wall-Milling-IMG.jpg 525 1400 Harvey Performance Company http://www.harveyperformance.com/wp-content/uploads/2018/08/Logo_HarveyPerformanceCompany-4.png Harvey Performance Company2017-04-03 09:19:422023-12-11 13:10:01Your Guide to Thin Wall Milling

How to Tackle Deep Cavity Milling the Right Way

March 24, 2017/0 Comments/in CNC Machining, CNC Programming, How-To's, Machining Techniques, Milling, Troubleshooting Tips/by Harvey Performance Company

Deep cavity milling is a common yet demanding milling operation. In this style, the tool has a large amount of overhang – or how far a cutting tool is sticking out from its tool holder. The most common challenges of deep cavity milling include tool deflection, chip evacuation, and tool reach.

Three Harvey tool extended reach tool holders in 3, 5, and 6 inch lengths

Avoid Tool Deflection

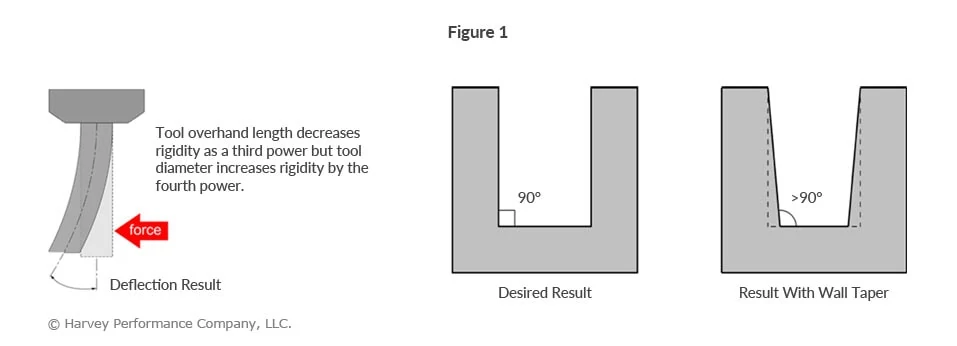
Excess overhang is the leading cause of tool deflection, due to a lack of rigidity. Besides immediate tool breakage and potential part scrapping, excessive overhang can compromise dimensional accuracy and prevent a desirable finish.

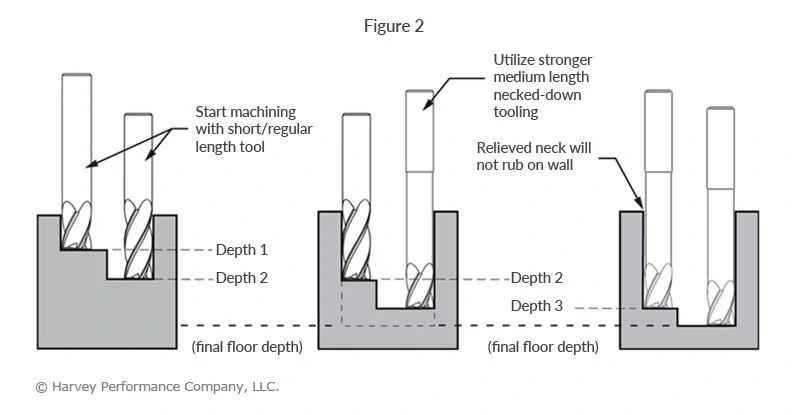
Tool deflection causes wall taper to occur (Figure 1), resulting in unintended dimensions and, most likely, an unusable part. By using the largest possible diameter, necked tooling, and progressively stepping down with lighter Axial Depths Of Cut (ADOC), wall taper is greatly reduced (Figure 2).

Infographic showing result of tool deflection and excess overhang on a part's finish
Infographic showing progressive step drilling procedures and depths of cut with varied length of tools

Achieve Optimal Finish

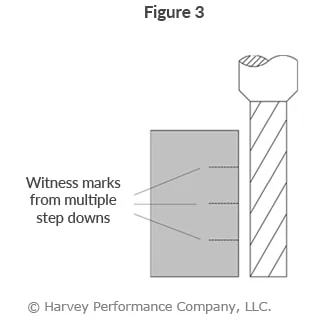
Although increasing your step-downs and decreasing your ADOC are ideal for roughing in deep cavities, this process oftentimes leaves witness marks at each step down. In order to achieve a quality finish, Long Reach, Long Flute Finishing End Mills (coupled with a light Radial Depth of Cut) are required (Figure 3).

Inforgraphic showing Deep Cavity Milling and witness marks from multiple step downs

Mill to the Required Depth

Avoiding tool deflection and achieving an acceptable finish are challenges that need to be acknowledged, but what if you can’t even reach your required depth? Inability to reach the required depth can be a result of the wrong tool holder or simply a problem of not having access to long enough tooling.

Fortunately, your tool holder’s effective reach can be easily increased with Harvey Tool’s Extended Reach Tool Holder, which allows you to reach up to 6 inches deeper.

Confidently Machine Deeper With Harvey Tool’s Extended Reach Tool Holders

Evacuate Chips Effectively

Many machining operations are challenged by chip evacuation, but none more so than Deep Cavity Milling. With a deep cavity, chips face more obstruction, making it more difficult to evacuate them. This frequently results in greater tool wear from chip cutting and halted production from clogged flute valleys.

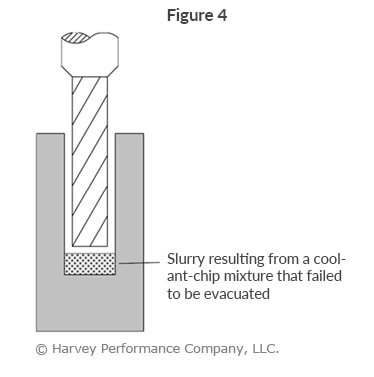
High pressure coolant, especially through the spindle, aids in the chip evacuation process. However, air coolant is a better option if heat and lubricity are not concerns, since coolant-chip mixtures can form a “slurry” at the bottom of deep cavities (Figure 4). When machining hardened alloys, where smaller, powder-like chips are created, slurry’s are a commonality
that must be avoided.

Deep Cavity Milling image showing result of failed chip evacuation when milling
https://www.harveyperformance.com/wp-content/uploads/2017/03/Featured-Image-Deep-Cavity-Milling-IMG.jpg 525 1400 Harvey Performance Company http://www.harveyperformance.com/wp-content/uploads/2018/08/Logo_HarveyPerformanceCompany-4.png Harvey Performance Company2017-03-24 19:08:432023-09-21 13:36:43How to Tackle Deep Cavity Milling the Right Way

How to Combat Chip Thinning

March 13, 2017/2 Comments/in CNC Machining, CNC Programming, High Efficiency Milling, How-To's, Machining Techniques, Quick Tips/by Tom Pyle

The following is just one of several blog posts relevant to High Efficiency Milling. To achieve a full understanding of this popular machining method, view any of the additional HEM posts below!

Introduction to High Efficiency Milling I High Speed Machining vs. HEM I Diving into Depth of Cut I How to Avoid 4 Major Types of Tool Wear I Intro to Trochoidal Milling


Defining Chip Thinning

Chip Thinning is a phenomenon that occurs with varying Radial Depths Of Cut (RDOC), and relates to chip thickness and feed per tooth. While these two values are often mistaken as the same, they are separate variables that have a direct impact on each other.

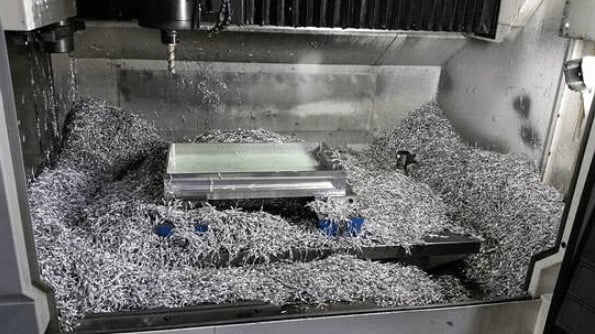
cnc machining setup covered in chips

Radial Depth of Cut

Radial Depth of Cut denotes the distance that a tool advances into a workpiece, also known as Stepover, Cut Width, or XY.

Feed Per Tooth

Feed per tooth translates directly to your tool feed rate, and is commonly referred to as Inches Per Tooth (IPT) or chip load.

Chip Thickness

Chip thickness is often overlooked. It refers to the actual thickness of each chip cut by a tool, measured at its largest cross-section. Users should be careful not to confuse chip thickness and feed per tooth, as these are each directly related to the ideal cutting conditions.

Download the Free, 50+ Page High Efficiency Milling Guidebook Today

How Chip Thinning Occurs

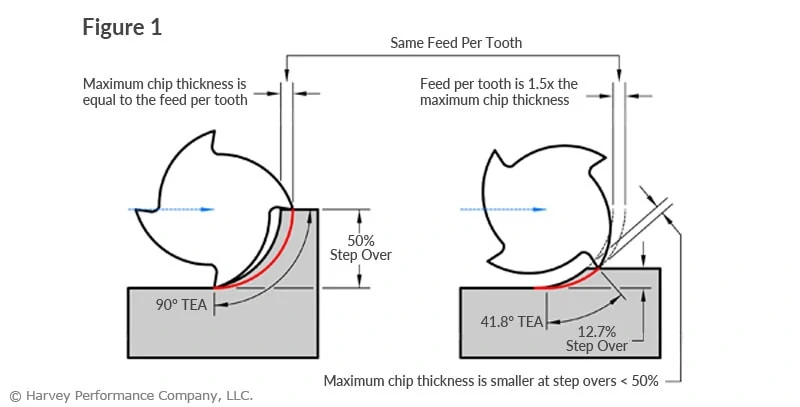
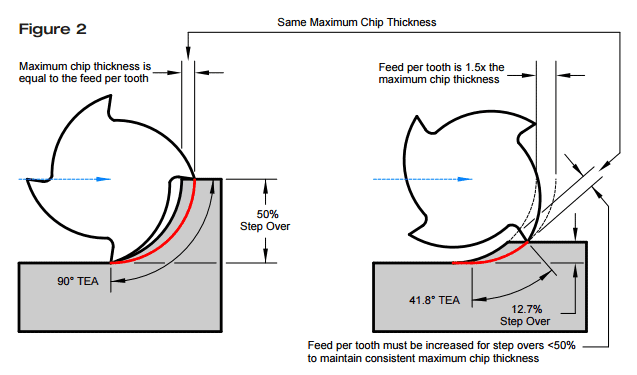
When using a 50% step over (left side of Figure 1), the chip thickness and feed per tooth are equal to each other. Each tooth will engage the workpiece at a right angle, allowing for the most effective cutting action, and avoiding rubbing as much as possible. Once the RDOC falls below 50% of the cutter diameter (right side of Figure 1), the maximum chip thickness decreases, in turn changing the ideal cutting conditions of the application. This can lead to poor part finish, inefficient cycle times, and premature tool wear. Properly adjusting the running parameters can greatly help reduce these issues.

comparison of radial chip thinning and feed per tooth

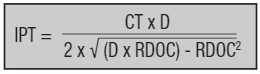
The aim is to achieve a constant chip thickness by adjusting the feed rate when cutting at different RDOC. This can be done with the following equation using the Tool Diameter (D), RDOC, Chip Thickness (CT), and Feed Rate (IPT). For chip thickness, use the recommended value of IPT at 50% step over. Finding an adjusted feed rate is as simple as plugging in the desired values and solving for IPT. This keeps the chip thickness constant at different depths of cut. The adjustment is illustrated in Figure 2.

Inches Per Tooth (Chip Thinning Adjustment)

IPT chip thinning formula
radial chip thinning adjustment profiles

Lasting Benefits

In summary, the purpose of these chip thinning adjustments is to get the most out of your tool. Keeping the chip thickness constant ensures that a tool is doing as much work as it can within any given cut. Other benefits include: reduced rubbing, increased material removal rates, and improved tool life.

High efficiency milling guidebook download
https://www.harveyperformance.com/wp-content/uploads/2017/03/Feature-Image-Chip-Thinning-IMG-1.jpg 525 1400 Tom Pyle http://www.harveyperformance.com/wp-content/uploads/2018/08/Logo_HarveyPerformanceCompany-4.png Tom Pyle2017-03-13 18:49:392024-02-27 10:32:43How to Combat Chip Thinning
Page 12 of 12«‹101112
BLOG HOME

Search In the Loupe

More results...

Browse by Topic

How-To’s
Technical Tips
Tools In Action
Featured Customers
Tool Guides

Free Drilling Guidebook

DOWNLOAD

Recent Posts

  • Machining a Complex Part with Harvey Tool
  • Drill Substrate Guide: HSS vs Cobalt vs Carbide
  • The Key Differences Between Helical’s Tool Coatings

Stay In The Loupe!

Sign up to receive a monthly recap of:
– The latest machining solutions
– Machining tips and tricks
– A recap of our most popular posts

SIGN UP

Contact Us


Address
428 Newburyport Turnpike
Rowley, MA 01969

Website
www.harveyperformance.com

Phone
Harvey Tool Tech: 1.800.645.5609
Helical Solutions Tech: 1.866.543.5422
Micro 100 Tech: 1.800.421.8065
Titan USA Tech: 1.888.482.6872

Email
[email protected]
[email protected]
[email protected]
[email protected]
[email protected]
Scroll to top Scroll to top Scroll to top