Harvey Performance Company
  • About Us
    • Company Overview
    • Our Unique Strengths
    • Our Partners
    • Our History
    • Our Locations
    • Sustainability
    • Giving Back
      • Giving Back
      • One Tree Planted
    • News
      • News
      • Press
  • Our Brands
    • Harvey Tool
    • Helical Solutions
    • Micro 100
    • Titan USA
    • CoreHog
    • Valor Holemaking
    • ATA Air Tools
    • ATA SGSPRO
    • Garryson
    • Industrial Tooling Corporation (ITC)
    • Karnasch
    • Van Hoorn Carbide
  • Products
    • Milling
    • Drilling
    • Grinding
    • Micro Tools
    • Sinking
    • Sawing
    • Composite Tools
    • Threading
    • Turning
    • Beveling
    • Reaming
    • Air Tools
  • Solutions
    • Aerospace
    • Automotive
    • Defense
    • Energy
    • Foundries
    • Marine
    • Medical
    • Mold & Die
    • Oil & Gas
    • Power Generation
    • Rail
  • Resources
    • CAM & TDM Tool Libraries
    • Machining Advisor Pro
    • In the Loupe Blog
    • Webinars
  • Careers
  • Contact Us
  • Menu Menu
  • Link to LinkedIn
  • Link to Facebook

Reducing Tool Runout

July 25, 2017/3 Comments/in CNC Machining, How-To's, Machining 101, Quick Tips, Troubleshooting Tips/by Harvey Performance Company

Tool runout is a given in any machine shop, and can never be 100% avoided. Thus, it is important to establish an acceptable level of runout for any project, and stay within that range to optimize productivity and prolong tool life. Smaller runout levels are always better, but choice of machine and tool holder, stick-out, tool reach, and many other factors all have an influence on the amount of runout in every setup.

Defining Tool Runout

Tool runout is the measurement of how far a cutting tool, holder, or spindle rotates off of its true axis. This can be seen in low quality end mills where the cutting diameter is true to size when measured while stationary, but measures above tolerance while rotating.

The first step to minimizing runout is understanding what individual factors cause runout in every machine setup. Runout is seen in the accuracy of every cutting tool, collet, tool holder, and spindle. Every added connection between a machine and the workpiece it is cutting will introduce a higher level of runout. Each increase can add to the total runout further and further. Steps should be taken with every piece of tooling and equipment to minimize runout for best performance, increased tool life, and quality finished products.

Measuring Runout

Determining the runout of your system is the first step towards finding how to combat it. Runout is measured using an indicator that measures the variation of a tool’s diameter as it rotates. This is done with either a dial/probe indicator or a laser measuring device. While most dial indicators are both portable and easy to use, they are not as accurate as the available laser indicators, and can also make a runout measurement worse by pushing on a tool. This is mostly a concern for miniature and micro-tooling, where lasers should be strictly used due to the tool’s fragile nature.  Most end mill manufacturers recommend using a laser runout indicator in place of a dial indicator wherever possible.
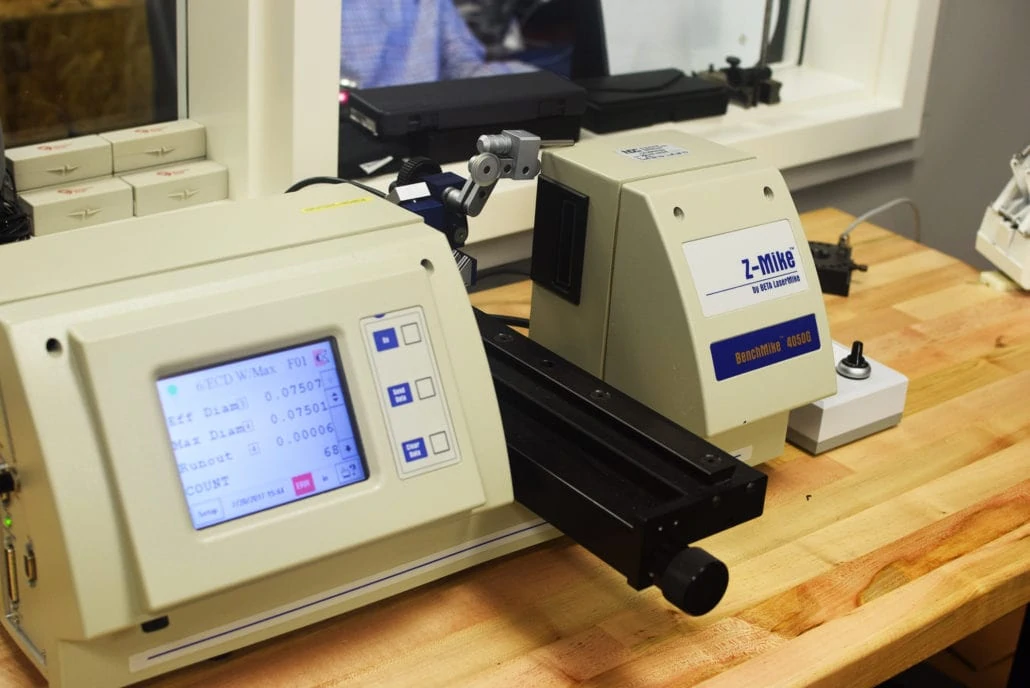
Z-Mike Laser

Z-Mike laser measurement devices are common instruments used to measure levels of tool runout.

Runout should be measured at the point where a tool will be cutting, typically at the end of the tools, or along a portion of the length of cut. A dial indicator may not be plausible in these instances due to the inconsistent shape of a tool’s flutes. Laser measuring devices offer another advantage due to this fact.

High Quality Tools

The amount of runout in each component of a system, as-manufactured, often has a significant impact on the total runout of a given setup. Cutting tools all have a restriction on maximum runout allowed when manufactured, and some can have allowances of .0002” or less. This is often the value that should be strived for in a complete system as well. For miniature tooling down to .001” diameter, this measurement will have to be held to an even smaller value. As the ratio of tool runout to tool diameter becomes larger, threats of tool failure increase. As stated earlier, starting with a tool that has minimal runout is pivotal in keeping the total runout of a system to a minimum. This is runout that cannot be avoided.

Precision Tool Holders

The next step to minimizing runout is ensuring that you are using a high quality, precision tool holder. These often come in the form of shrink-fit, or press-fit tool holders offering accurate and precise tool rotation.  Uniform pressure around the entire circumference of a shank is essential for reducing runout. Set screw based holders should be avoided, as they push the tool off-center with their uneven holding pressure.  Collet-based tool holders also often introduce an extra amount of runout due to their additional components. Each added connection in a tool holding system allows more methods of runout to appear. Shrink-fit and press-fit tool holders are inherently better at minimizing runout due to their fewer components.
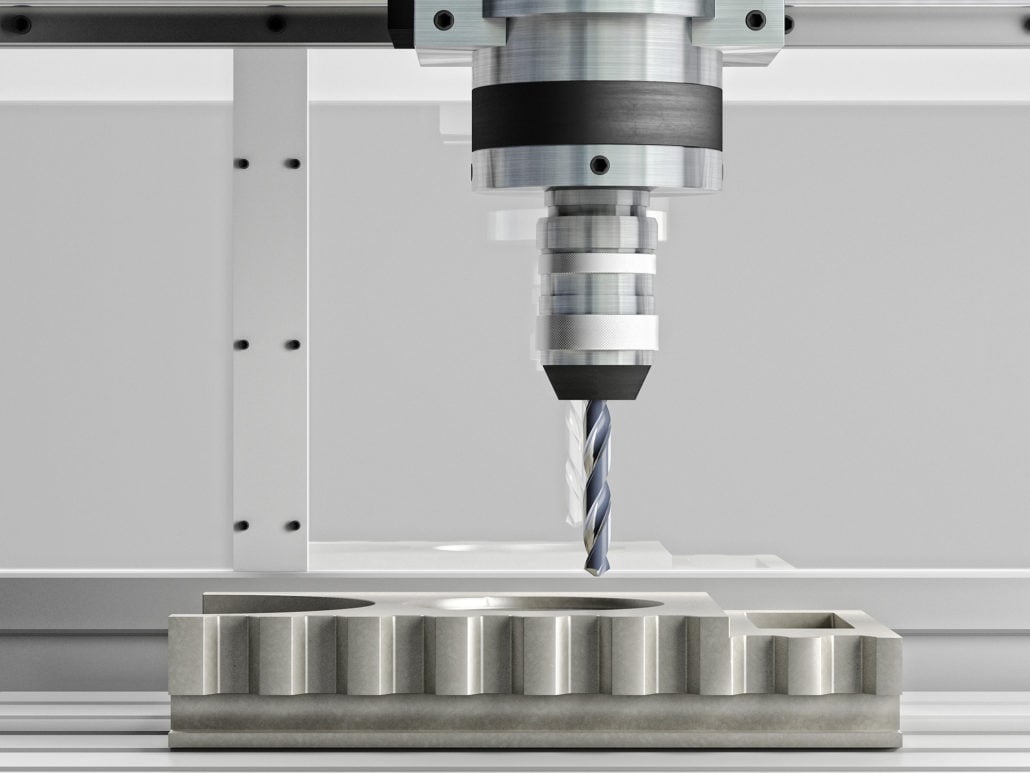
end mill in holder above completed part

Included in your tool holding considerations should be machine tool cleanliness. Often, chips can become lodged in the spindle, and cause an obstruction between two high-precision surfaces in the system. Ensuring that your tool holder and spindle are clean and free of chips and debris is paramount when setting up for every job.

Shank Modifications

Apart from equipment itself, many other factors can contribute to an increasing amount of tool runout. These can include how long a tool is, how rigid a machine setup is, and how far a tool is hanging out of its holder.  Shank modifications, along with their methods of tool holding can have a large impact. Often thought of as an older, obsolete technology, Weldon flats are found guilty of adding large amounts of runout in many shops. While many shops still use Weldon flats to ensure a secure grip on their tools, having a set screw pushing a tool to one side can push it off center, yielding very high levels of runout. Haimer Safe Lock™ is another option increasing in popularity that is a much higher performance holding technology. The Safe-Lock™ system is designed with the same tolerances as shrink fit and other high precision tool holders. It is able to minimize runout, while firmly holding a tool in place with no chance of pull-out.
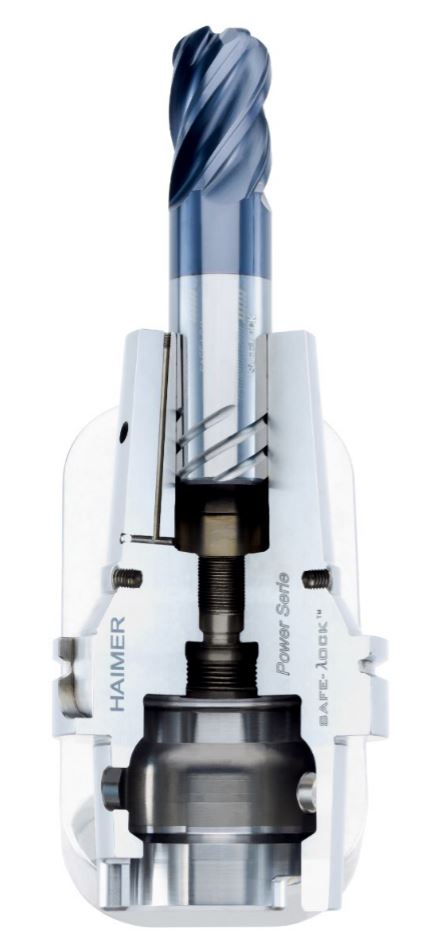
haimer safe lock tool holder for reducing tool runout

The Haimer Safe-Lock™ system is one option to greatly reduce tool runout.

Runout will never be completely eliminated from a machining system. However, steps can (and should) be taken to keep it to a minimum using every method possible. Keeping a tool running true will extend tool life, increase performance, and ultimately save your shop time and money. Runout is a common concern in the metalworking industry, but it is often overlooked when it could be main issue causing part rejections and unacceptable results. Every piece of a machine tool plays a part in the resultant runout, and none should be overlooked.

https://www.harveyperformance.com/wp-content/uploads/2017/07/Feature-Image-Tool-Runout-IMG.jpg 525 1400 Harvey Performance Company http://www.harveyperformance.com/wp-content/uploads/2018/08/Logo_HarveyPerformanceCompany-4.png Harvey Performance Company2017-07-25 11:45:352023-10-12 09:05:18Reducing Tool Runout

How to Avoid 4 Major Types of Tool Wear

July 11, 2017/10 Comments/in High Efficiency Milling, How-To's, Milling, Quick Tips, Troubleshooting Tips/by Harvey Performance Company

The following is just one of several blog posts relevant to High Efficiency Milling. To achieve a full understanding of this popular machining method, view any of the additional HEM posts below!

Introduction to High Efficiency Milling I High Speed Machining vs. HEM I How to Combat Chip Thinning I Diving into Depth of Cut I Intro to Trochoidal Milling


What Is Tool Wear?

Tool wear is the breakdown and gradual failure of a cutting tool due to regular operation. Every tool will experience tool wear at some point in its life. Excessive wear will show inconsistencies and have unwanted effects on your workpiece, so it is important to avoid tool wear in order to achieve optimal end mill performance. Tool wear can also lead to failure, which in turn can lead to serious damage, rework, and scrapped parts.

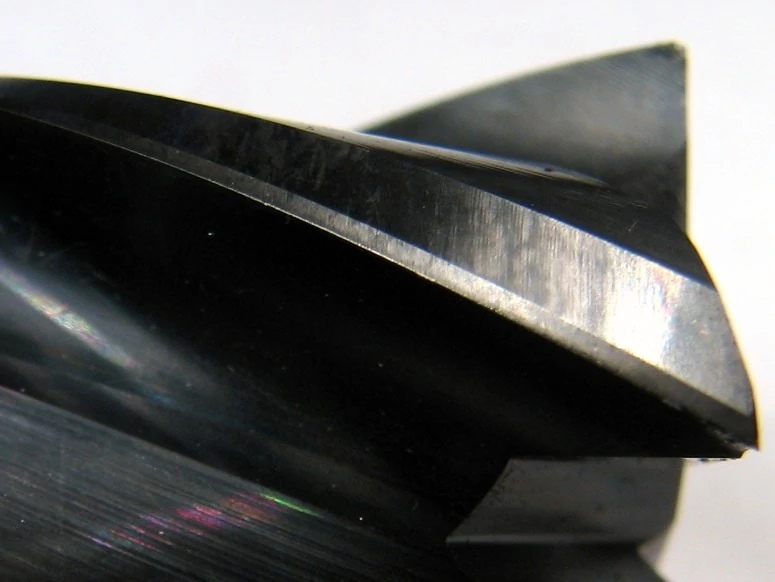
two close up images comparing an end mill with no tool wear and another with excessive tool wear
An example of a tool with no wear
end mill with excessive tool wear on cutting edge
An example of a tool with excessive wear

Download the Free, 50+ Page High Efficiency Milling Guidebook Today

To prolong tool life, identifying and mitigating the various signs of cutting tool wear is key. Both thermal and mechanical stresses cause tool wear, with heat and abrasion being the major culprits. Learning how to identify the most common types of tool wear and what causes them can help machinists remedy issues quickly and extend tool longevity.

Types of Tool Wear And Their Solutions

Abrasive Wear

The wear land is a pattern of uniform abrasion on the cutting edge of the tool, caused by mechanical abrasion from the workpiece. This dulls the cutting edge of a tool, and can even alter dimensions such as the tool diameter. At higher speeds, excessive heat becomes more of an issue, causing more damage to the cutting edge, especially when an appropriate tool coating is not used.

Utilizing Proper Tool Coatings

Using a tool coating with a high microhardness rating is crucial to avoiding abrasive wear. Microhardness ratings help determine a cutting tool’s level of wear resistance. For example, bare tungsten carbide has a Vickers Hardness (HV) ranging from 760 HV to 1740 HV while coatings such as TiN have an HV of 2213 or more. Despite facing maximum forces during cutting operations, the addition of coating on a tool significantly improves its ease of material removal due to higher hardness. When hardness in a coating is elevated wear is mitigated due to the stack up.

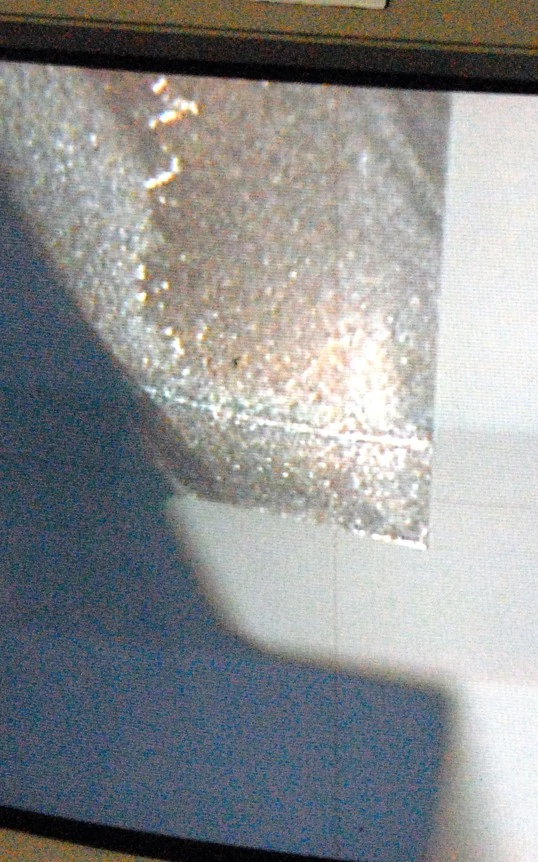
end mill with abrasive wear on cutting edge

Coolant Usage

If the wear land becomes excessive or causes premature tool failure, reducing the cutting speed and optimizing coolant usage can help. Coolant is directed towards the cutting action of a tool during CNC operations. It prevents tool failure by countering high temperatures. Generally machinists opt for either Flood or High Pressure coolant methods. Flooding allows for low pressure chip flushing by providing lubricity. High Pressure coolant provides almost instant cooling of a part and works to evacuate chips at a faster rate. Both methods improve part finish and minimize chip recutting, which can damage a cutting tool.

High Efficiency Milling

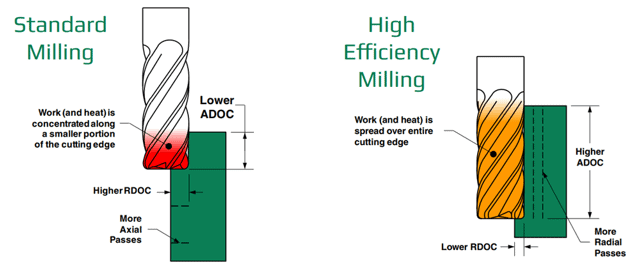
High Efficiency Milling (HEM) toolpaths can help reduce wear by spreading the work done by the tool over its entire length of cut. This prevents localized wear and will prolong tool life by using the entire cutting edge available. The image referenced below compares traditional (standard) milling and the newer HEM method. HEM evenly disperses heat across the cutting edge by employing a lower radial depth of cut (RDOC) and a higher axial depth of cut (ADOC). This reduces the likelihood of tool failure and lengthens the tool wear process.

infographic with two end mills comparing the difference between standard milling and high efficiency milling at the workpiece

Chipping

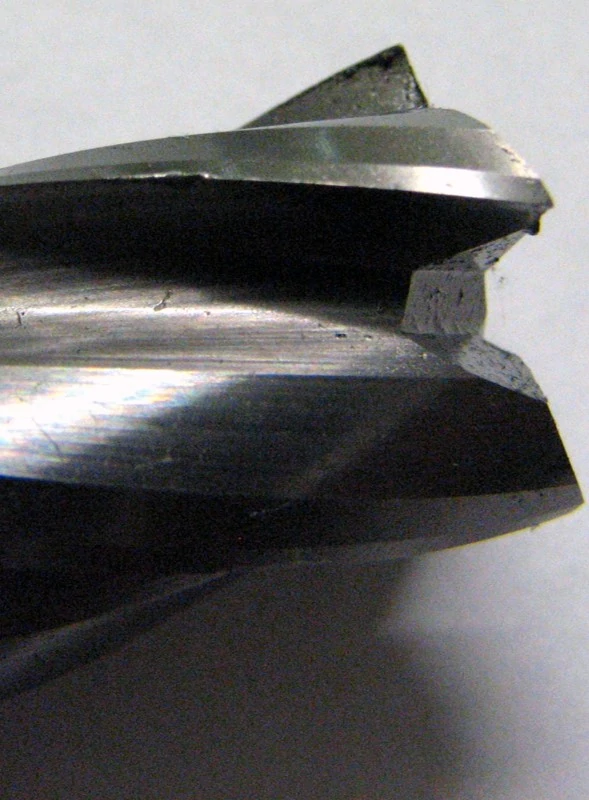
Chipping can be easily identified by a nicked or flaked edge on the cutting tool, or by examining the surface finish of a part. A poor surface finish can often indicate that a tool has experienced some sort of chipping, which can lead to eventual catastrophic tool failure if it is not caught. \When a chipped tool engages with a workpiece the cutting edges are not even leading to high and low spots within the surface finish.

end mill with chipping tool wear

Chipping is typically caused by excessive loads and shock-loading during operation, but it can also be caused by thermal cracking, another type of tool wear which is explored in further detail below.

Reduce Chatter

To counter chipping, ensure the milling operation is completely free of vibration and chatter. Chatter occurs because cutting tools experience high forces during CNC machining operations. While machinists cannot entirely avoid chatter, minimizing it prevents vibration marks and excess wear from appearing along the surface of a tool or part. Taking a look at the speeds and feeds can also help. Interrupted cuts and repeated part entry can also have a negative impact on a tool. Reducing feed rates for these situations can mitigate the risk of chipping.


Thermal Cracking

Thermal cracking is often identified by cracks in the tool perpendicular to the cutting edge. Cracks form slowly, but they can lead to both chipping and premature tool failure.

end mill thermal cracking

Thermal cracking, as its name suggests, is caused by extreme temperature fluctuations during milling. Adding a proper coating to an end mill is beneficial in providing heat resistance and reduced abrasion on a tool.

HEM Toolpaths

HEM toolpaths provide excellent protection against thermal cracking. As previously mentioned, these toolpaths spread the heat across the cutting edge of the tool, reducing the overall temperature and preventing serious fluctuations in heat.


Harvey HEM guidebook ad

Fracture

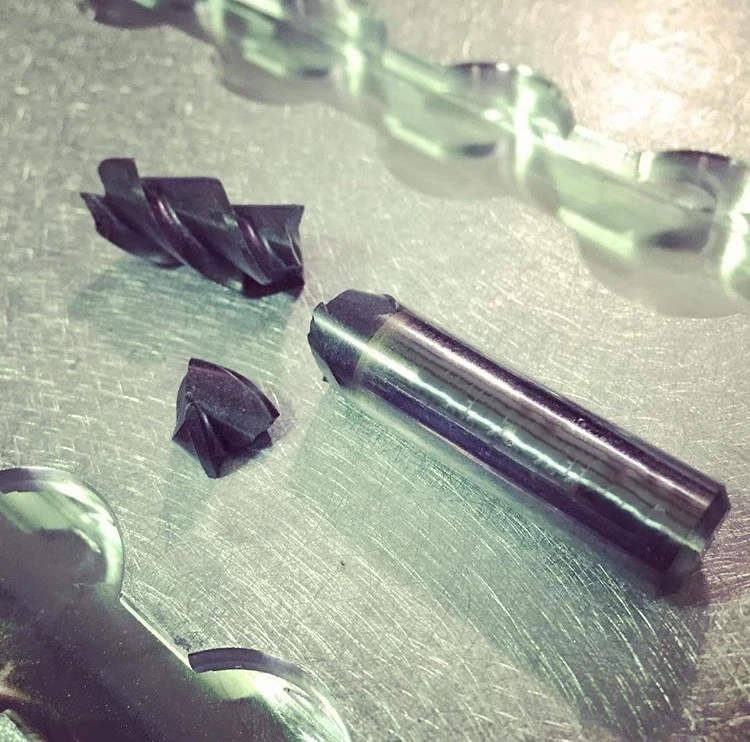
Fracture is the complete loss of tool usage due to sudden breakage, often as a result of improper speeds and feeds, an incorrect coating, or an inappropriate depth of cut.

Optimal Tool Holding

Tool holder issues or loose work holding can also cause a fracture, as can inconsistencies in workpiece material properties. Establishing a secure connection between the tool and machine reduces the risk of tool runout and scrapped parts. Machinists generally experience improved performance in hydraulic and shrink fit tool holders compared to more mechanical tightening methods.

broken end mill in two pieces from excessive tool wear
Photo courtesy of @cubanana___ on Instagram

Appropriate Depth of Cut

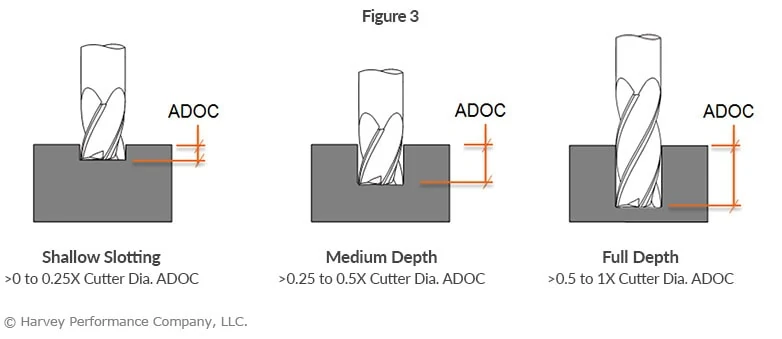
Adjusting the speeds, feeds, and depth of cut and checking the setup for rigidity will help to reduce fracturing. The tool’s axial engagement with a part must be appropriate in order to prevent tool deflection, especially during slotting operations. As pictured below, with increasing slot lengths comes the necessity for longer lengths of cut. Above all, you should choose a tool that offers the highest productivity and least amount of deflection.

drawing of three end mills and their axial depth of cut during cnc slotting operations

Optimizing coolant usage can also be helpful to avoid hot spots in materials which can dull a cutting edge and cause a fracture. HEM toolpaths prevent fracture by offering a more consistent load on a tool. Shock loading is reduced, causing less stress on a tool, which lessens the likelihood of breakage and increases tool life.


It is important to monitor tools and keep them in good, working condition to avoid downtime and save money. Wear is caused by both thermal and mechanical forces, which can be mitigated by running with appropriate running parameters and HEM toolpaths to spread wear over the entire length of cut. While every tool will eventually experience some sort of tool wear, the effects can be delayed by paying close attention to speeds and feeds and depth of cut. Preemptive action should be taken to correct issues before they cause complete tool failure.  

https://www.harveyperformance.com/wp-content/uploads/2017/07/Feature-Image-Tool-Wear-IMG.jpg 525 1400 Harvey Performance Company http://www.harveyperformance.com/wp-content/uploads/2018/08/Logo_HarveyPerformanceCompany-4.png Harvey Performance Company2017-07-11 16:30:432023-11-17 14:56:39How to Avoid 4 Major Types of Tool Wear

Corner Engagement: How to Machine Corners

May 15, 2017/1 Comment/in CNC Machining, CNC Programming, How-To's, Machining Techniques, Milling, Troubleshooting Tips/by Harvey Performance Company

Understanding Corner Engagement

During the milling process, and especially during corner engagement, tools undergo significant variations in cutting forces. One common and difficult situation is when a cutting tool experiences an “inside corner” condition. This is where the tool’s engagement angle significantly increases, potentially resulting in poor performance.

Challenges of Corner Engagement

Engaging corners improperly can lead to various issues, affecting both performance and quality. Some common challenges include:

  • Chatter:  – visible imperfections in corner finishes
  • Deflection – detected by unwanted wall taper measurements
  • Strange cutting sound – tool squawking or chirping in the corners
  • Tool breakage/failure or chipping – resulting from excessive stress or improper handling

Least Effective Approach (Figure 1)

Generating an inside part radius that matches the radius of the tool at a 90° direction range is not a desirable approach to machining a corner. In this approach, the tool experiences extra material to cut (dark gray), an increased engagement angle, and a direction change. As a result, issues including chatter, tool deflection/ breakage, and poor surface finish may occur.

Feed rate may need to be lessened depending on the “tool radius-to-part radius ratio.”

90 degree end mill corner engagement

More Effective Approach (Figure 2)

Generating an inside part radius that matches the radius of the tool with a sweeping direction change is a more desirable approach for corner engagement. The smaller radial depths of cut (RDOC) in this example help to manage the angle of engagement, but at the final pass, the tool will still experience a very high engagement angle.  Common results of this approach will be chatter, tool deflection/breakage and poor surface finish.

Feed rate may need to be reduced by 30-50% depending on the “tool radius-to-part radius ratio.”

corner engagement effective approach with multiple rdocs at 90 degrees

Most Effective Approach For Corner Engagement (Figure 3)

Generating an inside part radius with a smaller tool and a sweeping action creates a much more desirable machining approach. The manageable RDOC and smaller tool diameter allow for management of the tool engagement angle, higher feed rates and better surface finishes. As the cutter reaches full radial depth, its engagement angle will increase, but the feed reduction should be much less than in the previous approaches.

Feed rate may need to be heightened depending on the “tool-to-part ratio.” Utilize tools that are smaller than the corner you are machining.

most effective corner engagement of multiple passes into corner

Corner engagement is a critical aspect of machining that demands attention to detail and strategic planning. By implementing effective techniques and leveraging appropriate tools, manufacturers can overcome challenges associated with corner machining and achieve superior results.

https://www.harveyperformance.com/wp-content/uploads/2017/05/Featured-Image-Corner-Engagement-IMG.jpg 525 1400 Harvey Performance Company http://www.harveyperformance.com/wp-content/uploads/2018/08/Logo_HarveyPerformanceCompany-4.png Harvey Performance Company2017-05-15 07:00:142024-04-16 14:18:21Corner Engagement: How to Machine Corners

How to Avoid Common Part Finish Problems

April 25, 2017/7 Comments/in CNC Machining, How-To's, Machining 101, Quick Tips, Troubleshooting Tips/by Harvey Performance Company

Part Finish Reference Guide

Finishing cuts are used to complete a part, achieving its final dimensions within tolerance and its required surface finish. Most often an aesthetic demand and frequently a print specification, surface finish can lead to a scrapped part if requirements are not met. Meeting finish requirements in-machine has become a major point of improvement in manufacturing, as avoiding hand-finishing can significantly reduce costs and cycle times.

Common Finishing Problems

  • Burrs
  • Scallop marks
  • Chatter Marks

Factors That Influence Part Finish

  • Specific material and hardness
  • Cutting tool speeds & feeds
  • Tool design and deployment
  • Tool projection and deflection
  • Tool-to-workpiece orientation
  • Rigidity of workholding
  • Coolant and lubricity
  • Final-pass depth of cut

Finishing Problem Solutions

  • Tools with high helix angles and flute counts work best for finishing operations. Softer materials show great results with higher helices, while harder materials can benefit greatly from increased flute counts.
  • Increase your RPM and lower your IPT (Figure 2).
  • Ensure that tool runout is extremely minimal.
  • Use precision tool holders that are in good condition, are undamaged, and run true.
  • Opt for a climb milling machining method.
  • Use tooling with Variable Pitch geometry to help reduce chatter.
  • A proper radial depth of cut (RDOC) should be used. For finishing operations, the RDOC should be between 2 and 5 percent of the tool’s Cutter Diameter.
  • For long reach walls, use reduced neck tooling which help to minimize deflection (Figure 3).
  • Extreme contact finishing (3x cutter diameter), may require a 50% feed rate reduction.

part finish guide

length of cut

Common Surface Finish Nomenclature

Ra = Roughness average
Rq = RMS (Root Mean Square) = Ra x 1.1
Rz = Ra x 3.1

part finish guide

Share this entry
  • Share on Facebook
  • Share on X
  • Share on WhatsApp
  • Share on Pinterest
  • Share on LinkedIn
  • Share on Reddit
  • Share by Mail

https://www.harveyperformance.com/wp-content/uploads/2017/04/Feature-Image-Part-Finish-Reference-Guide-IMG.jpg 525 1400 Harvey Performance Company http://www.harveyperformance.com/wp-content/uploads/2018/08/Logo_HarveyPerformanceCompany-4.png Harvey Performance Company2017-04-25 12:30:242022-06-08 09:21:37How to Avoid Common Part Finish Problems

How to Tackle Deep Cavity Milling the Right Way

March 24, 2017/0 Comments/in CNC Machining, CNC Programming, How-To's, Machining Techniques, Milling, Troubleshooting Tips/by Harvey Performance Company

Deep cavity milling is a common yet demanding milling operation. In this style, the tool has a large amount of overhang – or how far a cutting tool is sticking out from its tool holder. The most common challenges of deep cavity milling include tool deflection, chip evacuation, and tool reach.

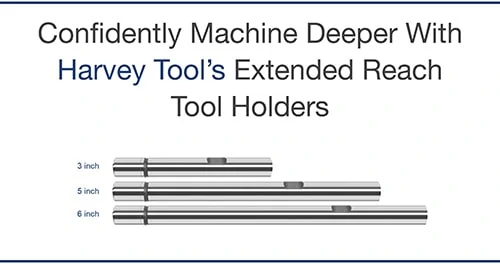
Three Harvey tool extended reach tool holders in 3, 5, and 6 inch lengths

Avoid Tool Deflection

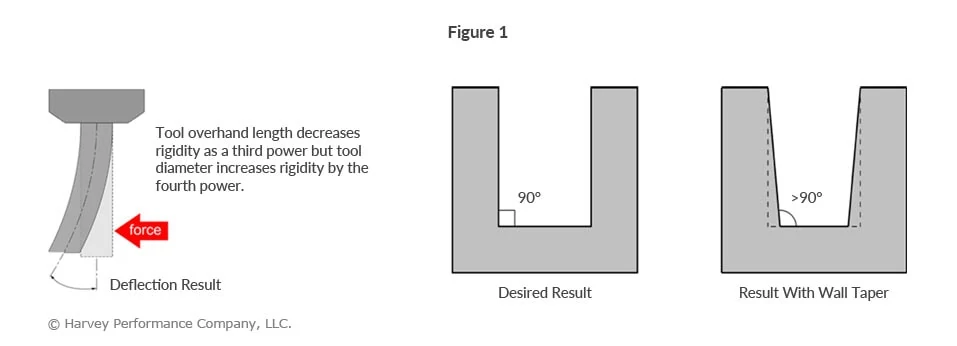
Excess overhang is the leading cause of tool deflection, due to a lack of rigidity. Besides immediate tool breakage and potential part scrapping, excessive overhang can compromise dimensional accuracy and prevent a desirable finish.

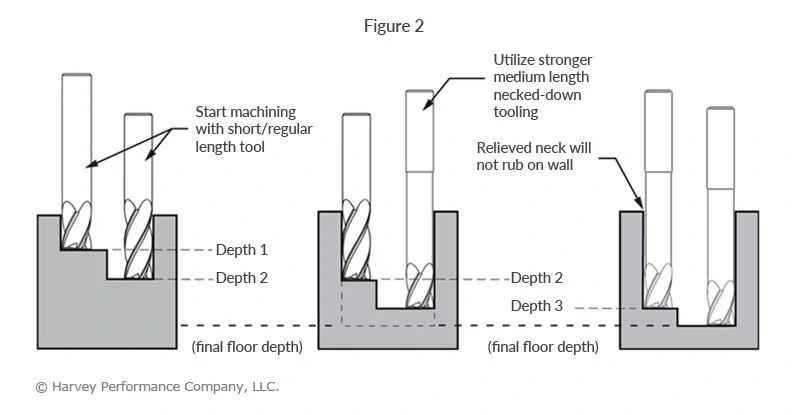
Tool deflection causes wall taper to occur (Figure 1), resulting in unintended dimensions and, most likely, an unusable part. By using the largest possible diameter, necked tooling, and progressively stepping down with lighter Axial Depths Of Cut (ADOC), wall taper is greatly reduced (Figure 2).

Infographic showing result of tool deflection and excess overhang on a part's finish
Infographic showing progressive step drilling procedures and depths of cut with varied length of tools

Achieve Optimal Finish

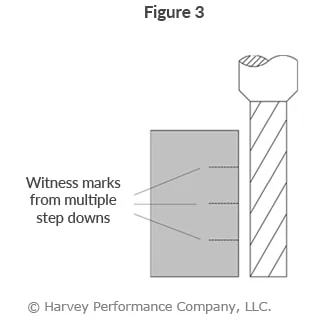
Although increasing your step-downs and decreasing your ADOC are ideal for roughing in deep cavities, this process oftentimes leaves witness marks at each step down. In order to achieve a quality finish, Long Reach, Long Flute Finishing End Mills (coupled with a light Radial Depth of Cut) are required (Figure 3).

Inforgraphic showing Deep Cavity Milling and witness marks from multiple step downs

Mill to the Required Depth

Avoiding tool deflection and achieving an acceptable finish are challenges that need to be acknowledged, but what if you can’t even reach your required depth? Inability to reach the required depth can be a result of the wrong tool holder or simply a problem of not having access to long enough tooling.

Fortunately, your tool holder’s effective reach can be easily increased with Harvey Tool’s Extended Reach Tool Holder, which allows you to reach up to 6 inches deeper.

Confidently Machine Deeper With Harvey Tool’s Extended Reach Tool Holders

Evacuate Chips Effectively

Many machining operations are challenged by chip evacuation, but none more so than Deep Cavity Milling. With a deep cavity, chips face more obstruction, making it more difficult to evacuate them. This frequently results in greater tool wear from chip cutting and halted production from clogged flute valleys.

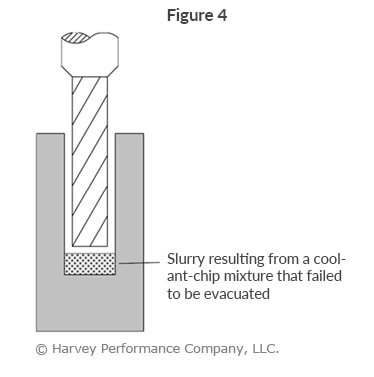
High pressure coolant, especially through the spindle, aids in the chip evacuation process. However, air coolant is a better option if heat and lubricity are not concerns, since coolant-chip mixtures can form a “slurry” at the bottom of deep cavities (Figure 4). When machining hardened alloys, where smaller, powder-like chips are created, slurry’s are a commonality
that must be avoided.

Deep Cavity Milling image showing result of failed chip evacuation when milling
https://www.harveyperformance.com/wp-content/uploads/2017/03/Featured-Image-Deep-Cavity-Milling-IMG.jpg 525 1400 Harvey Performance Company http://www.harveyperformance.com/wp-content/uploads/2018/08/Logo_HarveyPerformanceCompany-4.png Harvey Performance Company2017-03-24 19:08:432023-09-21 13:36:43How to Tackle Deep Cavity Milling the Right Way

How to Combat Chip Thinning

March 13, 2017/2 Comments/in CNC Machining, CNC Programming, High Efficiency Milling, How-To's, Machining Techniques, Quick Tips/by Tom Pyle

The following is just one of several blog posts relevant to High Efficiency Milling. To achieve a full understanding of this popular machining method, view any of the additional HEM posts below!

Introduction to High Efficiency Milling I High Speed Machining vs. HEM I Diving into Depth of Cut I How to Avoid 4 Major Types of Tool Wear I Intro to Trochoidal Milling


Defining Chip Thinning

Chip Thinning is a phenomenon that occurs with varying Radial Depths Of Cut (RDOC), and relates to chip thickness and feed per tooth. While these two values are often mistaken as the same, they are separate variables that have a direct impact on each other.

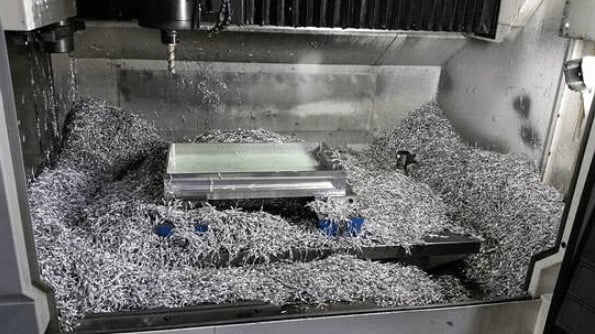
cnc machining setup covered in chips

Radial Depth of Cut

Radial Depth of Cut denotes the distance that a tool advances into a workpiece, also known as Stepover, Cut Width, or XY.

Feed Per Tooth

Feed per tooth translates directly to your tool feed rate, and is commonly referred to as Inches Per Tooth (IPT) or chip load.

Chip Thickness

Chip thickness is often overlooked. It refers to the actual thickness of each chip cut by a tool, measured at its largest cross-section. Users should be careful not to confuse chip thickness and feed per tooth, as these are each directly related to the ideal cutting conditions.

Download the Free, 50+ Page High Efficiency Milling Guidebook Today

How Chip Thinning Occurs

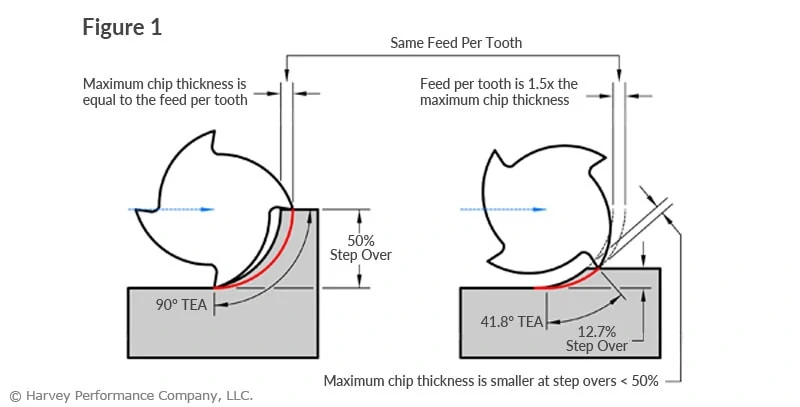
When using a 50% step over (left side of Figure 1), the chip thickness and feed per tooth are equal to each other. Each tooth will engage the workpiece at a right angle, allowing for the most effective cutting action, and avoiding rubbing as much as possible. Once the RDOC falls below 50% of the cutter diameter (right side of Figure 1), the maximum chip thickness decreases, in turn changing the ideal cutting conditions of the application. This can lead to poor part finish, inefficient cycle times, and premature tool wear. Properly adjusting the running parameters can greatly help reduce these issues.

comparison of radial chip thinning and feed per tooth

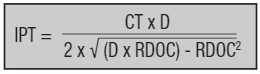
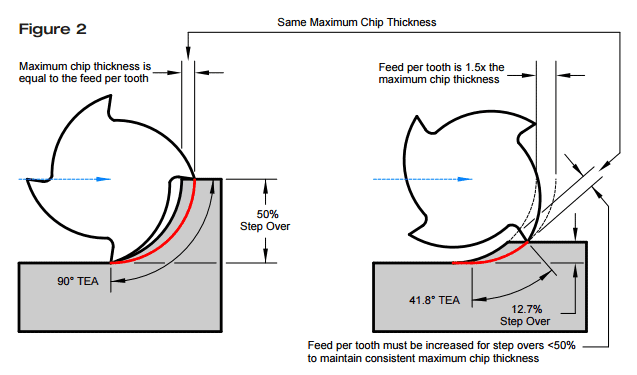
The aim is to achieve a constant chip thickness by adjusting the feed rate when cutting at different RDOC. This can be done with the following equation using the Tool Diameter (D), RDOC, Chip Thickness (CT), and Feed Rate (IPT). For chip thickness, use the recommended value of IPT at 50% step over. Finding an adjusted feed rate is as simple as plugging in the desired values and solving for IPT. This keeps the chip thickness constant at different depths of cut. The adjustment is illustrated in Figure 2.

Inches Per Tooth (Chip Thinning Adjustment)

IPT chip thinning formula
radial chip thinning adjustment profiles

Lasting Benefits

In summary, the purpose of these chip thinning adjustments is to get the most out of your tool. Keeping the chip thickness constant ensures that a tool is doing as much work as it can within any given cut. Other benefits include: reduced rubbing, increased material removal rates, and improved tool life.

High efficiency milling guidebook download
https://www.harveyperformance.com/wp-content/uploads/2017/03/Feature-Image-Chip-Thinning-IMG-1.jpg 525 1400 Tom Pyle http://www.harveyperformance.com/wp-content/uploads/2018/08/Logo_HarveyPerformanceCompany-4.png Tom Pyle2017-03-13 18:49:392024-02-27 10:32:43How to Combat Chip Thinning
Page 3 of 3123
BLOG HOME

Search In the Loupe

More results...

Browse by Topic

How-To’s
Technical Tips
Tools In Action
Featured Customers
Tool Guides

Free Drilling Guidebook

DOWNLOAD

Recent Posts

  • Machining a Complex Part with Harvey Tool
  • Drill Substrate Guide: HSS vs Cobalt vs Carbide
  • The Key Differences Between Helical’s Tool Coatings

Stay In The Loupe!

Sign up to receive a monthly recap of:
– The latest machining solutions
– Machining tips and tricks
– A recap of our most popular posts

SIGN UP

Contact Us


Address
428 Newburyport Turnpike
Rowley, MA 01969

Website
www.harveyperformance.com

Phone
Harvey Tool Tech: 1.800.645.5609
Helical Solutions Tech: 1.866.543.5422
Micro 100 Tech: 1.800.421.8065
Titan USA Tech: 1.888.482.6872

Email
[email protected]
[email protected]
[email protected]
[email protected]
[email protected]

CONTACT US

428 Newburyport Turnpike
Rowley, MA 01969-1729

844-393-8665

[email protected]

HARVEY PERFORMANCE

Company Overview
Our Unique Strengths
Industries Served
Careers
Sustainability
Privacy Policy

OUR BRANDS

Harvey Tool
Helical Solutions
Micro 100
Titan USA
CoreHog
Valor Holemaking

OUR BRANDS

ATA Air Tools
ATA SGSPRO
Garryson
Industrial Tooling Corporation (ITC)
Karnasch
Van Hoorn Carbide

Copyright © 2022 Harvey Performance Company, LLC
  • Link to LinkedIn
  • Link to Facebook
Scroll to top Scroll to top Scroll to top