How to Adjust Running Parameters for Miniature Tooling
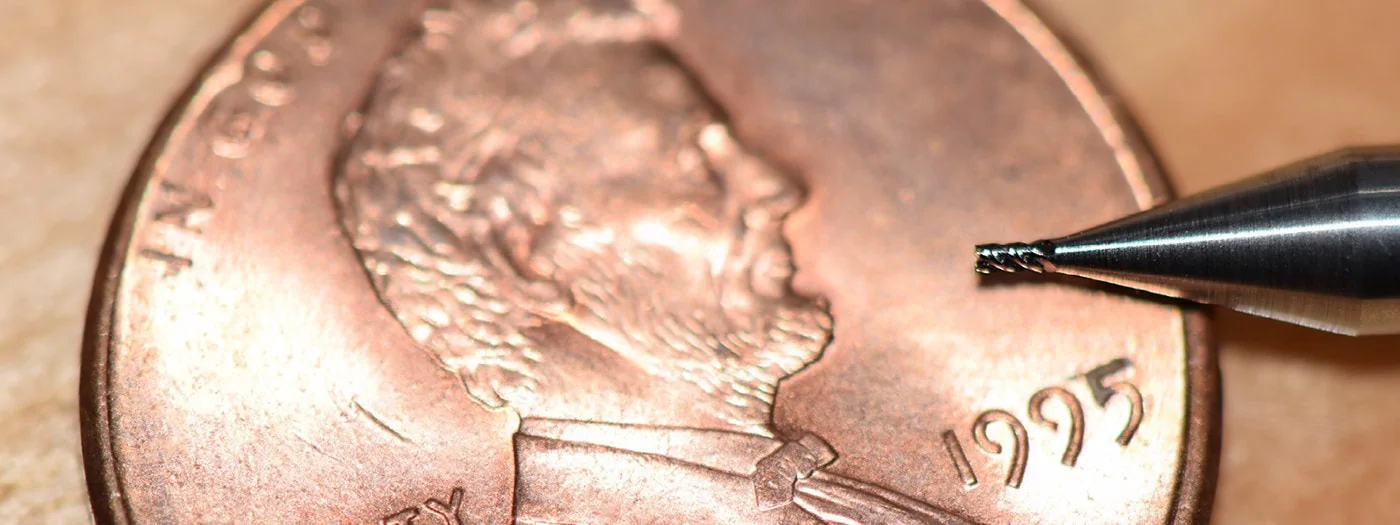
High precision machining is a subset of subtractive manufacturing that has grown in popularity over the years, especially as industries like medical, dental, mold tool and die, and semi-conductor manufacturing grow. Some jobs can call for extremely small diameters (down to even .001”) and ultra-precise tolerancing. With tooling this miniature, machinists must utilize different machining practices than they otherwise would, as common issues that would arise with larger end mills are magnified within miniature tooling applications. Speeds and feeds become critical to ensure your tool survives the job.
Where Breakage Occurs with Miniature Tooling
When breakage happens with miniature tooling, it’s important to determine where on the tool the breakage is occurring. Breakage points are sometimes quite difficult to see with such small tooling. Finding the location, when possible, helps to diagnose the issue. For example, if the breakage occurs along the length of cut, there could be chip packing. If chip packing is the issue, it’s helpful to decrease the feed rate and lower the depth of cut per pass. If the tool breaks on the transition angle toward the shank, this could be due to a few things. The first instinct should be to check the runout of the tool. Runout should be measured at less than .0001”. In this case, check tool set up to ensure that the tool is stable within the tool holder. Another issue could be excess pressure on the tool caused by high pressure coolant or even deflection. Deflection occurs when the cutting pressure causes the tool to bend slightly – in this case, the tool will break at its weakest point. To minimize the opportunity for deflection, ensure the tool is the largest diameter and shortest length of cut possible for the job.

Tips for Avoiding Future Breakage
There are a few different points of interest to focus on to prevent tool breakage.
The Right Tool
Determining the correct end mill is the necessary first step toward preventing breakage. Choosing a material specific end mill is preferred, especially with the more difficult to machine materials. Harvey Tool’s material specific tools have different geometries and coatings for different materials. For example, our aluminum specific end mills have a variable helix of approximately 42 ° whereas the high temperature alloy specific end mills we offer have a variable helix of about 34°. A tool with an odd number of flutes or a variable helix or pitch also helps to avoid chatter that could lead to breakage in the machining process. Approaches also change depending on the application. With slotting for example, rigidity is critical for success, therefore a tool with the most flutes possible is recommended.
Tool Set Up
The smaller the tool, the more fragile it is. Therefore, proper handling before and during set up is critical. It is key to keep tooling in the original packaging if it is not in the machine and covering the tip when positioning the tool in the tool holder. Determining coolant for miniature tooling is also critical to ensure that high pressure from the coolant doesn’t cause damage of the tool. High pressure coolant directly to the tool almost always causes some form of breakage. For this reason, high pressure coolant is not recommended on the smaller end of the miniature tooling spectrum. In this case, flood coolant is the recommended approach.
Miniature Tooling Running Parameters
Running speed of an end mill is determined based on the tool diameter, so the smaller the tool, the faster the RPM. To ensure best tool life, it is crucial to run the smaller end mills at the recommended parameters.
Harvey Tool speeds and feeds charts list recommendations for SFM, chip load and depth of cut based on the cutting material, tool diameter and cutting application. To calculate speeds and feeds using Harvey Tool speeds and feeds charts, follow the following formulas and our recommended parameters:

Note*: There are often limitations with the machines used for these tools. One of the most asked questions about our speeds and feeds for miniature end mills is how to adjust for this quick speed. We recommend setting the RPM at something the machine can handle (or the fastest the customer feels comfortable with) and keep the feed rates and depth of cut the same.
Choosing depth of cut parameters for miniature tooling is extremely important based on the application. For example, finishing parameters often have a much higher speed and feed rate than slotting or roughing parameters but the depth of cut passes are much smaller. This enables the tool to run such high parameters without breakage as there is less contact with the workpiece.

Using miniature tooling can be a little bit intimidating if you’ve never used it before. Issues that arise with larger end mills tend to be amplified with smaller tools. It is very important to have the right end mill for the application. Speeds, feeds, and depth of cut are also essential in proper cutting. With smaller tooling comes higher speeds. Always follow manufacturer recommended speeds and feeds, lowering the speed when necessary to accommodate machine capabilities. Lastly, if breakage does occur, be sure to find where the break is to help diagnose the issue.
As a member of Harvey Performance Company’s technical team, Tara works with customers to answer questions regarding tool selection, speeds & feeds, custom tool design and tool applications. Tara earned her Bachelor’s degree in Chemical Engineering from UMass Amherst.


Hi Tara, thank a lot for the information.
Is there any article or information page you can point me to regarding how to set the z=0 axis on such miniature tooling? Would the paper method work?
Hi Jose,
Traditionally, we would not recommend a paper method as there is a good chance you can break the tool while setting the z-axis. We always recommend using a pre-setter for miniature tools. If you do not have access to one then you can turn the spindle on and slowly crank it down to the top of the part. As soon as it makes the slightest contact with the top of the part you can set the z height there. It will cut a small amount of material but that’s better than crushing the tool on the top of the part. When you get into extremely small tooling (< .050" in diameter) you'll want to start considering measuring the tool on comparators or optical tool setters if you have them available to you. You'll also want to avoid high pressure coolant and opt for a MQL or "Mist" coolant application. Please feel free to reach out to our technicians if you have a specific tool in mind and they'll be able to assist you further.
I really appreciate your support and the information provided.