Tips for Maintaining Tight Tolerances
In manufacturing large production runs, one of the biggest difficulties machinists experience is holding tooling to necessary tolerances in holes, walls, and threads. Typically, this is an iterative process that can be tedious and stressful, especially for inexperienced machinists. While each job presents a unique set of challenges, there are rules of thumb that can be followed to ensure that your part is living up to its accuracy demands.
What is a Tight Tolerance?
A tolerance is an allowable amount of variation in a part or cutting tool that a dimension can fall within. When creating a part print, tolerances of tooling can’t be overlooked, as tooling tolerances can result in part variations. Part tolerances have to be the same, if not larger, than tool tolerances to ensure part accuracy.
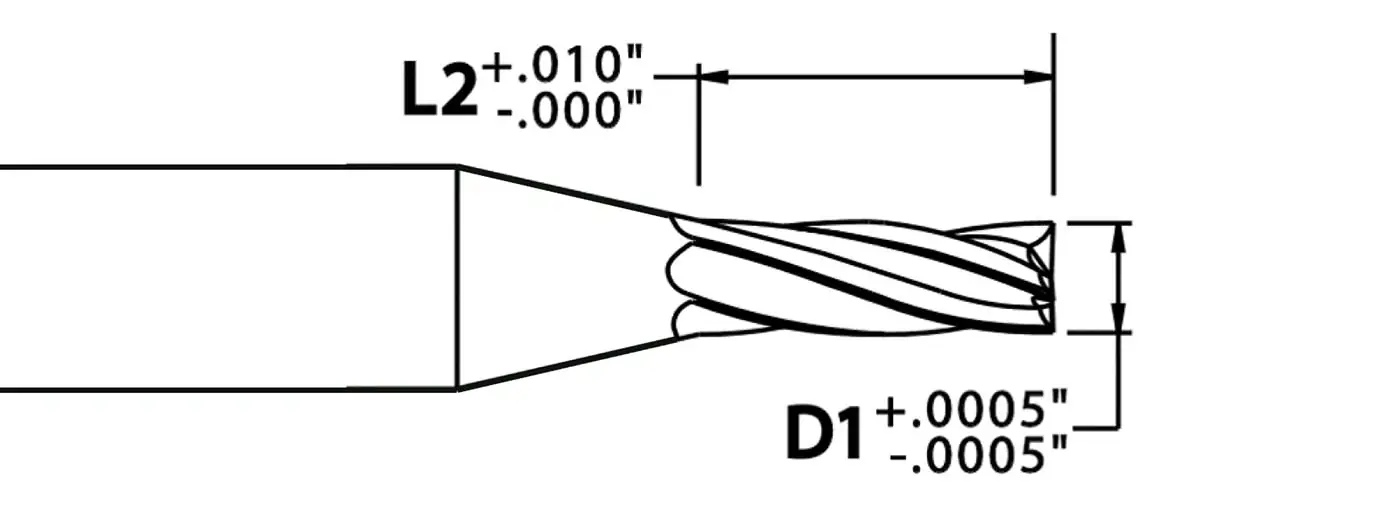
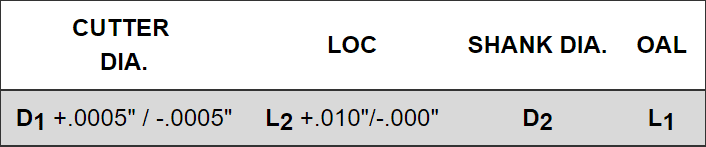
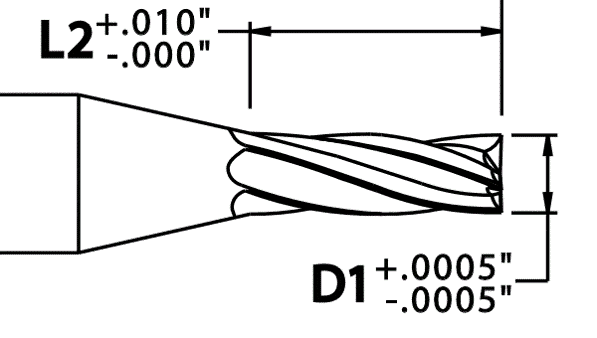
Cutting tool tolerances are oftentimes applied to a tool’s most critical dimensions, such as Cutter Diameter, Length of Cut, Shank Diameter, and Overall Length. When selecting a cutting tool for a job, it’s critical to choose a brand that adheres to strict tolerance standards and reliable batch-to-batch consistency. Manufacturers like Harvey Tool and Helical Solutions prominently display tolerances for many critical tool dimensions and thoroughly inspect each tool to ensure that it meets the tolerances specified. Below is the table header for Harvey Tool’s line of Miniature End Mills – Square – Stub & Standard.
Tolerances help to create repeatability and specificity, especially in an industry in which even a thousandth of an inch can make or break a final product. This is especially true for miniature tooling, where Harvey Tool is experienced in the designing and manufacturing of tooling as small as .001” in diameter.
How Are Tolerances Used?
When viewing a tolerance, there’s an upper and lower dimension, meaning the range in which the dimension of the tool can stray – both above and below what its size is said to be. In the below example, a .030″ cutter diameter tool’s size range would be anywhere between .0295″ and .0305.”
Maintaining Tolerances in Holemaking Operations
Holes oftentimes mandate the tightest dimensional tolerances, as they generally are meant to align perfectly with a mating part. To maintain tolerances, start first by testing the runout of both your machine and your tool. This simple, yet often overlooked step can save machinists a great amount of time and frustration.
Spotting Drills
Spotting Drills allow for drills to have a very precise starting point, minimizing walking or straying from a desired path. This can be especially beneficial when machining irregular surfaces, where accessing a hole’s perfect location can be more difficult.

Reamers
Reaming is great for any very tight tolerance mandate, because many Miniature Reamers have much tighter tolerances than a drill. Harvey Tool’s Miniature Reamers, for example, have tolerances of +.0000″/-.0002. for uncoated options and +.0002″/-.0000″ for AlTiN coated tools. Reamers cut on their chamfered edge, removing a minimal amount of material within a hole with the ultimate goal of bringing it to size. Because the cutting edge of a reamer is so small, the tool has a larger core diameter and is thus a more rigid tool.

Maintaining Tight Tolerances While Machining Walls
Be Wary of Deflection
Maintaining tolerances when machining walls is made difficult by tool deflection, or the curvature a tool experiences when a force is applied to it. Where an angle is appearing on a wall due to deflection, opt for a reached tool to allow for less deflection along the tool’s neck. Further, take more axial depths of cut and machine in steps with finishing passes to exert less pressure on the tool. For surface finish tolerances, a long fluted tool may be required to minimize evidence of a tool path left on a part.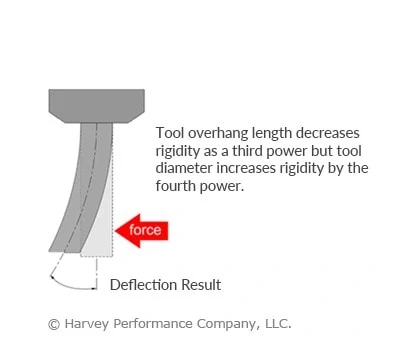
Corner Radius End Mills
Corner radius End Mills, because they do not feature a sharp edge, will wear slower than a square end mill would. By utilizing corner radius tooling, fracturing on the tool edge will be minimized, resulting in an even pressure distribution on each of the cutting edges. Because the sharper edge on a square tool is less durable and more prone to cracking because of the stress concentration on that point, a corner radius tool would be much more rigid and thus less susceptible to causing a tolerance variation. For this reason, it’s recommended to use a roughing tool with a corner radius profile and a finisher with a square profile for an edge tolerance. When designing a part and keeping manufacturing in mind, if there is a potential for a wall with a radius as opposed to a wall with a square edge, a wall with a radius allows for easier machineability and fewer tool changes.
Maintaining Tight Tolerances While Threading
Making threads to tolerance is all about chip evacuation. Evacuating chips is an issue commonly overlooked; If chips within a hole have not been removed before a threading operation, there could be interference in the tool tip that leads to vibration and chatter within a thread. This would decrease the continuity of the thread while also altering the points of contact. Discontinuity of a thread could be the difference between passing and failing a part, and because threading is typically the last application when machining to decrease damaging the threads, it also increases the likelihood of chips remaining within the hole from other applications.
Tolerances Summarized
If you continue to experience troubles maintaining tight tolerances despite this blog post, consult the Harvey Tool or Helical Solutions tech team, as the problem may exist outside of your machine. Temperature and humidity can vary how gummy a material is, and can lead to workpiece expansion and contraction. Additionally, the foundation of buildings can expand and contract due to outside temperature, which can result in upped runout and irregular vibration in a spindle.


I like your manufacturing tips. I need to have stronger products. I’ll have to talk to different contractors for options.